Tag Archives: Multiple Sections

Get Multiple Selected Dates with WebCalendar

Calendar is a control that looks simple but very useful in desktop or web development, so there is no question why there are lots of calendar control out there. Those calendar controls usually can select single date or can return single date only.

In certain scenario, there is a requirement where you would like to be able to perform multiple selections or get multiple dates from the calendar control. For example in scheduling scenario, there is a condition that the event will be a range event or occur in custom date (the dates does not align), and many other scenarios that require more than just single selection or single date.

To overcome the above scenarios, WebCalendar control is implemented with “MultipleSelection” feature which can give you a range of date and multiple selections. In this post, I will show you how to enable this feature.

For your information, WebCalendar is part of WebEssentials suite for ASP.NET which contains 8 new controls such as WebAccordion, WebProgressBar, WebListBox, etc. For further information about WebEssentials can be found here.

Enable MultipleSelection in WebCalendar

The default selection behavior in WebCalendar is single selection. In single selection, you can access WebCalendar’s selected date value in SelectedDate property. In multiple selections, you can access WebCalendar’s slected dates value in SelectedDates collection property.

To enable MultipleSelection in WebCalendar, set EnableMultipleSelection property to True.

The following images show SelectedDate, SelectedDates and EnableMultipleSelection property in WebCalendar control.

image

image

When multiple selections feature is enabled, you can highlight multiple dates in WebCalendar using mouse. The behavior is the same with performing multiple selections in desktop OS (press, hold and drag the mouse).

Actually, you can also perform the multiple selections using keyboard. In order to use the keyboard action, EnableKeyboardSupport property in WebCalendar should be enabled. You will get the comprehensive multiple selection behavior in WebCalendar with the combination of mouse and keyboard. Like desktop OS, you can highlight WebCalendar’s date with click and drag using mouse, use CTRL, SHIFT, or CTRL + SHIFT to get random selections.

When keyboard support is enabled, you can also start using the directional keyboard keys to move between months and dates in WebCalendar. [Enter] key is used to select a date and [Space] key is used to cycle through the available views (Day, Month, Year) in WebCalendar.

Some illustration of multiple selections in WebCalendar is shown in the following screenshots and video.

image

For your information the multiple selections feature in WebCalendar is designed to work in Day view mode only.

Get Multiple Selected Dates from WebCalendar

In this post sample, I will show you how to get the previous/old selected dates and the latest/new selected dates from WebCalendar through OnSelectedDateChanged client side events and display the information for user. OnSelectedDateChanged client side event is the client side event in WebCalendar that will be triggered when WebCalendar’s SelectedDate or SelectedDates property value is changed.

First, enable WebCalendar’s EnableMultipleSelection and EnableKeyboardSupport property by set the property value to True then start implementing OnSelectedDateChanged client side event.

The following screenshots show the implementation of OnSelectedDateChanged client side event in WebCalendar.

image

function WebCalendar1_OnSelectedDateChanged(controlId, oldDates, newDates)
{
	var WebCalendar1 = ISGetObject(controlId); 

	return true;
}

Notice that OnSelectedDateChanged client side event has 3 parameters:

  • controlId is the id of the WebCalendar control
  • oldDates is the collection of the old selected dates
  • newDates is the collection of the new selected dates

Next, I will write simple code that will get the old and new selected date and put them as the div element’s innerHTML like illustrated in the following sample.

Here is the result after the above code implementation.

function WebCalendar1_OnSelectedDateChanged(controlId, oldDates, newDates)
{
    var WebCalendar1 = ISGetObject(controlId); 

    var oldDatesDiv = document.getElementById("oldDatesDiv");	    var newDatesDiv = document.getElementById("newDatesDiv");

    for (var i = 0; i < oldDates.length; i++)
	oldDatesDiv.innerHTML += oldDates[i] + "<br />";
	         for (var j = 0; j < newDates.length; j++)
	newDatesDiv.innerHTML += newDates[j] + "<br />";

    return true;
}

Here is the result after the above code implementation.

image

In this post, you have learned how to enable multiple selections and get multiple selected dates in WebCalendar. If you have any question, feedbacks or comments, feel free post them to our community forum.


Best Regards,

Budianto Muliawan

Unique Multiple Sections in WebTextEditor

As you may already aware, we’ve released WebTextEditor last month along with other new products in our 2009 R1 volume releases. If you haven’t familiar with our rich text editor, please read “Introducing WebTextEditor” part 1 and part 2. In this post, I’m going to share some of our unique but often overlooked features, such as multiple sections feature.

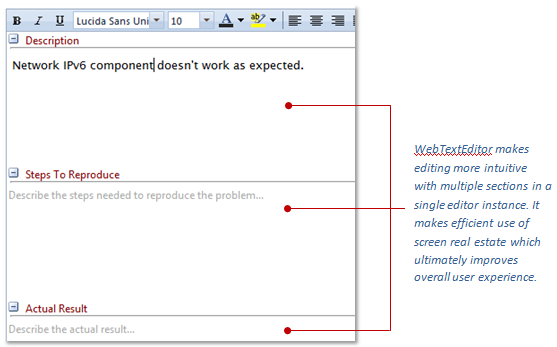
Unlike other editors that can only have single editable area, unique to Intersoft WebTextEditor is the capability to have multiple sections in a single editor. This time-saving feature creates new possibilities and richer editing experiences that are previously difficult to achieve. For instances, you often have application scenarios where the form has several editable fields that require rich formatting, such as in product feedback form, you may want to have Description, Steps to Reproduce and Actual Result.

With traditional editors, you’d likely end up with 3 separate text editors, which not only clutter up your page, but also slows down the overall page performance with redundant elements. WebTextEditor elegantly addressed this challenge with multiple sections feature, which can be seen clearly in the following screenshot.

Intersoft WebTextEditor with multiple section implementation

Intersoft WebTextEditor with multiple section implementation

By default, WebTextEditor uses single section instead of multiple sections. Single section settings can be found in RootTextEditor property while multiple sections settings can be found in each TextEditorSection object. In this implementation, each section in multiple sections can have their own settings.  To enable multiple sections, simple add the TextEditorSection object into TextEditorSections collection.

When multiple sections are activated, the single section configuration such as in RootTextEditor will be automatically ignored.

Here are some properties and settings that can be customized in WebTextEditorSection :

  • Content
    Gets or sets the section’s content.
  • Cssfiles
    This is a collection property; user can specify the custom CSS files to be loaded into each section.
  • Height
    Specify the minimum height of section. This property is applicable only in multiple sections. Leave it empty for single section.
  • Name
    Specify the name of section. This property is applicable only in multiple sections. Leave it empty for single section.
  • ReadOnly
    Determines whether the section should be read only or not.
  • Text
    Specify the caption text of the section. This property is applicable only in multiple sections. Leave it empty for single section.
  • WatermarkSettings
    This is a property that handle watermark of sections.

The following topics discuss the settings above in more details.

Loading Your Own Custom CSS Files

WebTextEditor provides built-in professional styles when working with editor in Design view. For example, tables and image frame will be properly formatted to make the document more readable.

In addition, WebTextEditor also provides flexibility to add custom CSS files to WebTextEditor. The CSS files collection can be added in RootTextEditor >> CssFiles property, however when multiple section is enabled, the CSS files collection needs to be added in each section using [each WebTextEditorSection] >> CssFiles property.

In CSS file object, the following properties needs to be specified:

  • FilePath
    Specifies the path of CSS file.
  • Type
    Specifies the type of CSS file.

There are two types supported in WebTextEditor:

  • DesignerStyleSheet
    Designer-typed CSS files will be loaded when editing the content in Design view
  • RuntimeStyleSheet
    Runtime-typed CSS files will be used when previewing or printing the content.

When WebTextEditor is used in blog application or other content management application, usually there are certain format and styles that need to be applied for consistency purpose. Designer-typed styles used in WebTextEditor will not be used when the content is saved, previewed, and printing, making it suitable for this scenario.Instead, the runtime-typed styles will be automatically applied to the content.

Making a Specific Section Read Only

This feature give capability to user to be able to determine whether the section of WebTextEditor should be readonly (non editable) or not.

There are 2 ways to specify ReadOnly property :

  1. Simply set the section’s ReadOnly property to true from WebTextEditor’s designer in design time.
  2. Configure ReadOnly from client-side using SetReadOnly client-side function. There are two parameters for this function: isReadOnly(boolean) and editorSectionName(string).
    isReadOnly parameter determines whether or not the section should be read-only, while editorSectionName determines the section name where read-only configuration should be applied. The second parameter is needed when multiple sections is enabled only.

Watermark Display

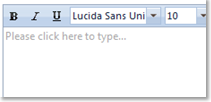
With watermark feature, WebTextEditor can display a default text before any user interaction occurs on an empty editor. The text can be customized for more user-friendly message such as “Type here for subject…”

Watermark

In multiple sections, the watermark setting can be customized in WatermarkSettings property in each WebTextEditorSection object.

That’s all for now on multiple sections. Please feel free to comment for any questions or any feedback on this multiple section feature. Please click here to learn more about this feature and related rich editing features, or click here to learn more on WebTextEditor.

You can also test drive WebTextEditor in your application and see how it fits to your requirements. Click here to download our free 30-day evaluation version.

Hope you enjoy this post,
Budianto.
Lead Product Engineer.